Coreldraw could also used to draw eye like what we see in manga and anime (Japanese comic and animation). Drawing manga or anime character’s eye needspatience and perseverance because the processes are more complicate than any other facial organs. But we often making it, it will be lot easier and fun.
1. First of all, we’ll need to draw an object using bezier tool. Bezier too are a sub-tool from Freehand tool in Toolbox.
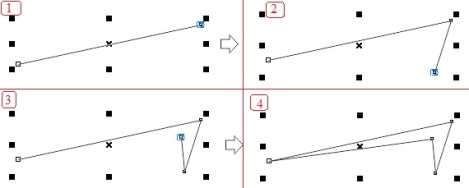
2. Create four nodes using Bezier tool, you can create the node by only clicking like picture shown below. The fourth node must be clicked in the first node, so it can become an object instead of just a line.
3. This object will be the upper side of the eye. Click the object and then press F10. The object will be in Shape tool mode. Right click on one of the object’s line, Select To Curve. Do this to all line in this object.
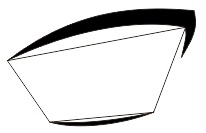
4. There will be blue arrows after we process To Curve earlier, and this allows us to make the line Flexible. Use those blue arrows to adjust the flexibility of the lines (Can also by click-and-dragging the lines). Flex all lines so it could like this, does not need to be exactly the same.
5. Color it with black color.
6. That upper side is done already, now we draw the lower side. Just make 3 other nodes using bezier tool.
7. Adjust the flexibility using shape tool until it looks like this. Give it black color.
8. Set the position of the two objects we just made like this.
9. Pick Bezier tool again and click in every corner of the object we just made. Make sure the fourth node are clicked in the first node so it can be an object.
10. And again, we have to use Shape tool to flex it, and don’t forget to click on every line and select To Curve. Adjust flexibility ofthe line so it can be inside the first 2 object we created. Also adjust flexibility of the line on the right side and left side and make it more oval and not too stiff.
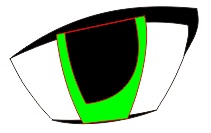
11. After you done with object above, create a rectangular object using bezier tool. Adjust the flexibility to follow the curvature of the eyeball. Give it green color (or other color you prefer).
12. Copy the green object, and give it black color. Decrease the object’s size and put it in the middle of green object.
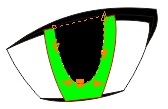
13. Select the Eyeball object that we just made, then click Shape Tool. There’s twonodes at the bottom of object. Remove the node in the right side by clicking it and press Delete.
14. Still in Shape tool mode, click-and-drag the node at the bottom to middle. Adjust the size of the object so it could looks like half a circle.
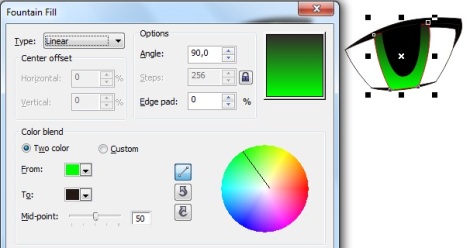
15. Now click the green colored object, then press F11. Fountain fill window will Appear. Give it color From Green to Black. And give the value 90 for the Angle.
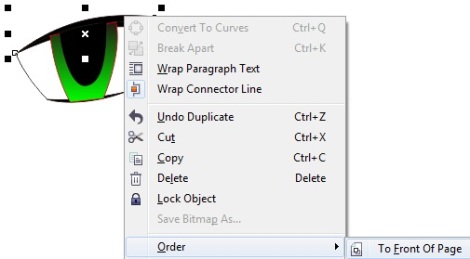
16. Right click at the upper eye object, Order >> To Fornt of Page. This command will make this object in to the front layer.
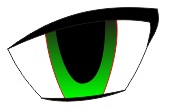
Do the same to the lower eye object. This way we made the eyeball become inside the Eye.
17. Now we have to make Eyeball object become more shiny. The trick, click the black eyeball object and press Ctrl + C and Ctrl V. It will create a new object in the exactsame place. Give the object 30% black (gray) from the color palette.
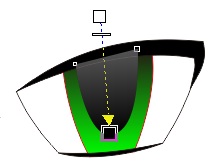
18. Now click on the gray object, then click Transparent tool from the toolbox. Click-drag around the object from top to bottom, then drag the slider of the Transparent tooltoward higher.
19. Repeat the Orders step that we did in Step-16 so the upper eye will be in the top of layers.
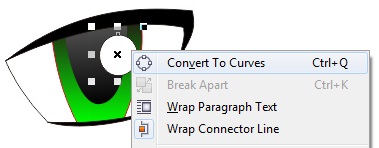
20. Now we will create the lighting for this eye object. Make a circle first, and put it inthe eye section. Give these circles a white color. Then right click on the circle andselect Convert to curves.
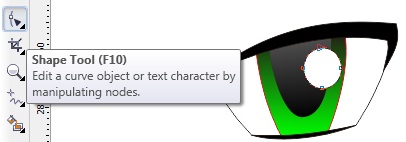
21. The circle will be flexible and can be shaped according to our wishes. Therefore,click on the circle and click the Shape tool.
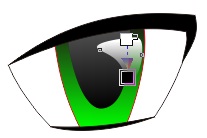
22. earlier circular shape to resemble a triangle with the Shape tool. Keep the trianglethat we make to follow the eyeballs corner. Well, this one is rather difficult and must bea little more patient. Remove the outline.
23. When finished making the above triangular object, click the object and click the transparency tool. Click-drag from top to bottom so that objects appear brighter eyes.
24. We need to create a single lighting effect again in the bottom of the eye. This oneis not difficult, just make a small circle with the Ellipse tool which is oval and tilt.Remove the outline. No need transparency here.
The tutorial of making this anime and manga eye finally finished, a little morecomplicated, but if it is used to train our self this would not be this complicated. Tomake the eyes of the left, we just need to copy the eye object then perform Mirrorhorizontally. And you can add shadows under the eyes of the top if necessary.
For reference and learning purpose only, here I provide the download link
Download (CDR)
Download (SVG)
If you found out that the download link is not working, or no longer active, please let me know by posting it in comment collumn.
If the file you downloaded is not compatible with your CorelDraw Version, let me know it too. Thanks
You can also draw eyes of your favorite manga / anime / cartoon character with by using this method. Just like the picture shown below. Download link available.
Download (CDR)
Download (SVG)
And also I would like to apologize if you find a lot of wrong gammar here, I’m not an english native. I just want share some thing you can do with CorelDraw.










No comments:
Post a Comment